 After a tough battle with some nasty Duergar in the lower levels of Firehammer Hold, the PCs decided to take a short rest before facing more of the Deep Dwarves and pressing further indo the depths of the Dwarven stronghold.
As we near the end of another season of D&D Encounters we’re starting to see our numbers swell again. There were four tables at Hairy T North in Toronto, one using 4e and three using D&D Next. At the combined tables Craig and I ran we had nine players huddled around one massive wet-erase battle mat.
At the super table we had the following PCs: Drow Paladin, Drow Rogue, Half-Orc Paladin, Half-Orc Cleric, Half-Orc Mage/Barbarian, Elf Ranger, Elf Cleric/Rogue, Human Monk/Barbarian, and Dwarf Fighter.
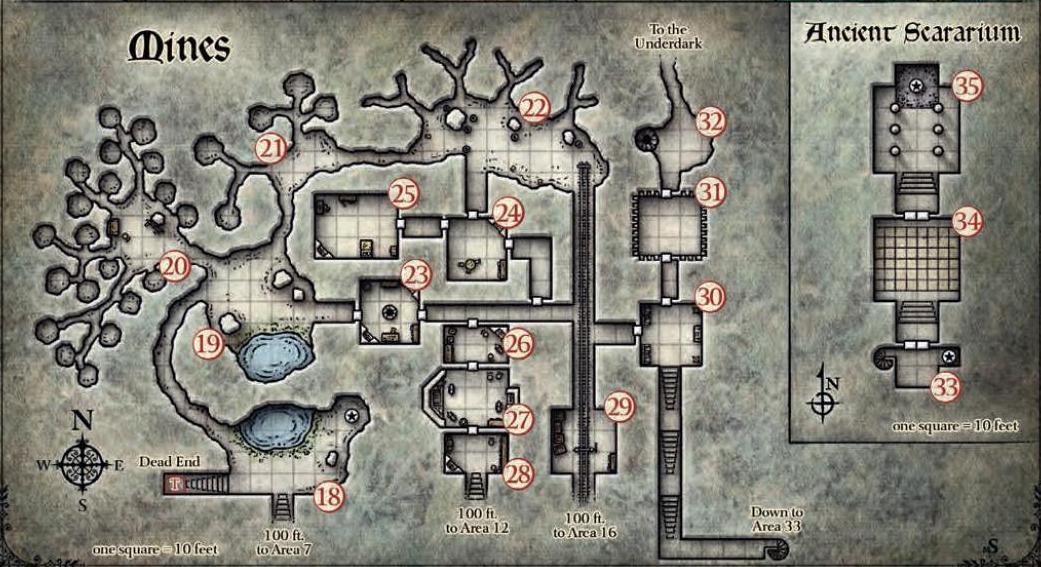
Firehammer Hold
After an hour of resting the party decided to venture onward. The Fighter and Drow Paladin were first to head out. They made no effort to be quiet or careful, trusting that the Duergar wouldn’t be right outside the door waiting for them. They were right (this time).
The hallway before them had three doors. The first led to an “L” shaped room that was dark and empty so they didn’t enter. The next door was locked so the left it. The final door led to the Shingling Chamber (#26) where the Dwarves worked the raw metal and ore they mined here. Through another door in this room they found the Forge (#27) and then Storage (#28).
The three Half-Orcs were next to venture out and decided to check out the “L” shaped room the others disregarded. On the floor and pushed to the side were bedrolls, blankets, and dirty clothes. Someone was using this as a sleeping area until very recently. As they rounded the bend they saw another door but it was locked. The Mage decided to cast a Knock ritual to open it.
The Ranger and Monk were getting impatient and quietly crept out into the hall to see what the other PCs were doing. The Ranger decided to follow the cart tracks and head into the Iron Mine (#22). The Monk waited in the hallway where he could see all the PCs.
The Fighter and Paladin finished in the mining rooms and went back to the locked door. The Dwarf decided to use his “key” (his axe) to open the door. It made a lot of noise and after a few good chops he managed to break a gap in the door wide enough to look through. In the Utility Room (#23) he saw all manner of food stuffs and casks of Dwarven ale. He decided to give up for now and head back towards the “L” shaped room.
By this time the Knock ritual was done and the door to the Barracks (#24) swung open. Seven Duergar were inside, all armed and ready for the PCs.
 During the first round the PCs who acted early in the initiative remained in the hallway and attacked using ranged weapons and magic. The Monk rushed into the “L” shaped room and also attacked from range. When the Duergar got their turn they unleashed their booby trap upon the PCs.
While the heroes were taking their short rest the Duergar suspended blankets from the ceiling of the “L” shaped room. Contained on top of the blankets were hundreds of caltrops. With the pull of a rope the blankets would come loose on one side and rain down caltrops on the PCs. The falling metal pieces wouldn’t hurt the PCs but it coated the entire floor of the room making movement difficult and slow.
Realizing that they PCs in the caltrop room were sitting ducks the Half-Orc Paladin activated the Delimbiyr Bloke. This summoned nine Astral Constructs that looked like Dwarven Warriors. They sprang forth from the Bloke and occupied the first nine empty spaces into the Barracks.
The two Duergar Priests took full advantage of the target-rich environment and both cast Flaming Sphere to its maximum effect. Those in the “L” shaped room had disadvantage on their Dex save and at the start of their turns took significant damage. Half of the Astral Dwarves also took a lot of fire damage since they were so bunched up.
In the subsequent rounds the PCs got slaughtered. The Flaming Sphere’s were deadly in their own right, but the caltrops made things so much worse. None of the PCs wanted to risk stepping on caltrops so they all just moved half their speed. This left them open to more fire damage. Once they finally got past the caltrops they provoked multiple opportunity attacks from the Duergar.
During those first few rounds of decimation the Fighter, Ranger, Rogue and Cleric/Rogue all ran towards the sounds of the screaming. When they saw what was happening they were unsure how to help without getting badly burned. The Ranger and Fighter both decided they didn’t want to risk the caltrops and fire so they doubled back to see if there was another way into the Barracks through the Iron Mine. The Rogues decided to start clearing the caltrops just in case a hasty retreat was needed.
The Half-Orc Paladin decided not to participate in the combat; instead he looted the Forge area stealing unworked metal that was very heavy and not very valuable.
Back in the combat zone the DMs d20s cooled off and the Duergar stopped hitting. The Spectral Warriors got their moment in the spotlight as they did managed to get a few good hits in on the Duergar making it easier for the PCs to clean house. Unfortunately the Flaming Spheres killed them all quickly.
One of the Duergar Priests fled and his Flaming Sphere disappeared, while the other called for help from the adjacent room. The next round Nalifarn, the Duergar leader, joined the battle casting Burning Hands at the PCs who and once again grouped themselves tightly together. (It was not a good week for PC tactics.)
The Duergar Priest cast Cause Fear on the Half-Orc Paladin just in time to protect Nalifarn. However, it only took another two rounds for the PCs to overcome the last of Duergar, kill the Priest, and ultimately kill Nalifarn too.
Once combat ended they heroes heard the whimpering sounds of a voice calling for help from Nalifarn’s Study (#25). They ran in to find Jekk chained to the wall. He’d been badly burned and tortured. He was malnourished and in really bad shape. The Cleric used his most powerful healing magic to heal himself, Jekk and the four most wounded PCs. Once healed, Jekk told the PCs what he knew.
He was ambushed and taken captive by the Duergar when he first approached Firehammer Hold. While imprisoned he overheard a lot of things.
These Duergar were working for the Red Wizards of Thay. Nalifarn the Duergar leader met with Thegger Grynn, a male Red Wizard leading a group of Gnolls. The Duergar gave the Thayans a large shipment of arms. The Thayans have a fortress somewhere in the Forlorn Hills, a place called Bloodgate Keep.
Turning back to immediate issues, Jekk told the PCs that the Duergar have been using slave labour to work in the mines. The slaves and some Duergar guards are no doubt still somewhere within Firehammer Hold.
We ran out of time so the DMs had to narrate the last part of the session. The PCs, along with Jekk, were easily able to defeat the Duergar slavers. When the slaves were released 10 of the 20 grabbed weapons and helped fight the Duergar. The overwhelming odds led to an easy victory.
Most of the slaves were captives from Julkoun, and a few were Dwarves stationed at Firehammer Hold. All were extremely grateful to the PCs. The Dwarves allowed the PCs to pillage the Duergar treasure but requested they not take anything that clearly belonged to the Hold. The PCs begrudgingly agreed.
With the enemies killed, the PCs rested and then were on the road back to Daggerford. They agreed to bring the Julkoun refugees back to Daggerford with them so they could head home from there.
Thoughts
This was another great week at our FLGS. The group didn’t really split up so we ended up running the party of nine through one large initiative. It was a bit slow at times, but it felt exciting.
The PCs were once again confounded by their own tactics as the DMs used caltrops in conjunction with spellcasters to make things really deadly for them. I think this setup gave some of the newer players respect for something as simple of caltrops when used intelligently.
The combat could have been so much worse if the player with the Bloke hadn’t used it when she did. It was probably the best time to use it and it certainly saved a few PCs from death.
I was a bit disappointed that some PCs chose not to get involved in the heart of the combat. I respect the decision to stay in character and not run into certain damage, but had the situation been reversed I think some of the players who did not engage this week would have been upset if the other characters didn’t come to their rescue. I was impressed that players who could clearly see the whole map drawn out didn’t use this knowledge to affect how their character behaved.
Next week is the grand finale. We’re going to pick things up back in Daggerford and hope that things get resolved in the one session we have left. It should be fun no matter what happens. I’m really looking forward to it.
Additional Resources
- Pre-generated characters: Visit our D&D Next Pre-Generated Character Library where you can download the level 2 pre-gens that came with this season’s adventure.
- Maps: A two-part poster map came with the Launch Weekend kits. If you want your own copy you can now download the poster map. Half is the map of the Sword Coast, half is the detailed map of Daggerford.
Recounting Encounters Podcast
Recounting Encounters is a weekly podcast I record with fellow Toronto DM, Craig Sutherland, and Marc Talbot (Alton) from 20ft Radius in which we recount that week’s experiences with D&D Encounters. We share the highlights from our respective FLGS and we talk about what worked, what didn’t and what we might have done differently. Find all episodes of Recounting Encounters on iTunes.
Note: New episodes of Recounting Encounters will be available in our D&D Encounters Archive and on iTunes on Wednesdays moving forward. Now DMs can listen before they play.
Visit the Dungeon’s Master D&D Encounters Archive for all of our ongoing weekly coverage as well as other great D&D Encounters articles and resources.
 Looking for instant updates? Subscribe to the Dungeon’s Master feed!
2 replies on “D&D Encounters: Scourge of the Sword Coast (Week 11)”
In our penultimate session at Modern Myths in Northampton, MA (running a 4e conversion of the adventure), the party had completed Firehammer Hold & headed to the Floshin estate to stop the Red Wizards in their final bit of portal magic research/testing, which they would then bring to Bloodgate keep to bring in armies of soldiers and/or undead and/or demons to take over the Sword Coast. They also knew that the succubus Pencheska planned to co-opt the portal energy at the Floshin estate to allow her devil lord Baazka to fully reconstitute in this world, so that the two of them could “Make a throne of corpses from which Asmodeus could rule the invasion of this mortal realm.” You know, typical archvillain stuff all around.
First step was getting inside the Floshin Estate and to the area where the Red Wizards were working. Since Lord Floshin had gone insane prior to abandoning his estate, I was able to have a lot of fun with crazy traps… doors that opened (violently) down (like a drawbridge) to crush unsuspecting heroes, infinite fall hallways, portraits that shot water from lapel flowers, etc. When they finally got down to the Red Wizards, though, things got rough.
We had a reasonably balanced party: Warlord, Shaman, Vampire, Warlock, & Paladin. However, against the 3 Red Wizards (all ranged artillery) & 4 soldiers, they just couldn’t seem to focus their fire or act tactically to shut down any of the powers the wizards threw at them. This made for a very long & drawn out fight, and while the PCs eventually succeeded, they lost a LOT of surges and action points along the way (maybe a daily power or two as well).
When all was said & done, they found the secret stairway leading down to the final fight, which they’ll have next week. Oh, and they also found a map with the location of Bloodgate Keep marked on it, which will lead into next season’s adventure. They’re excited, but cautiously so. Nobody knows what this Devil Lord Baazka is going to look like, nor are they yet sure how the Delimbiyr Bloke item that they carry will affect their fortunes. I guess we’ll see…
I ran an abridged version of the Floshin Estate this week in the hopes of getting through it in the one session – but despite playing for 3.5 hours its going to take part of the finale week too.
Really enjoyed this adventure and cant wait for the new one too. We’ve received our Launch kits but just waiting for the download code now. With the player maps not being included it might have been an idea to have put 2 of the bigger maps in each kit perhaps, as in our store its not going to be easy for both tables to see the one map at the same time, but we’ll muddle through somehow I guess.