 During week 2, our first session in the Doomvault, we discovered just how deadly this killer dungeon really is. Our party of seven spent most of the time running form monsters only to be forced into a fight with two Gorgons. The creatures’ breath weapons petrified two PCs leaving us with 5 PCs and two statues.
On the plus side one of the other parties exploring the dungeon found a master Glyph Key that was attuned to all gates (except the Temples of Extraction). They came to us, since the Gorgon fight happened within sight of a Black Gate, and copied their key’s magic into ours giving us complete access to the Doomvault. Now we have to figure out how to proceed.
This week at Hairy T North in Toronto we ran three tables: table 1 (DM: Craig) had four players, table 2 (DM: Hillel) had six players, and table 3 (DM: Tim) had seven players including me.
My party consisted of the following PCs: Tiefling Wizard, Human Cleric, Warforged Monk, and Halfling (Kender) Rogue, and Dwarf Barbarian (my character). The Gnome Wizard and Elf Ranger began the session stoned.
Death of a Character
This season if a PC dies the player has two options. They can bring in a brand new character or they can invoke the death charity option called “Walking Dead.” Syranna, the rebel Red Wizard who brought the PC to the Doomvault can use the magic of the dungeon to bring back a slain PC as a soul-bound undead. They return with half hit points and function mechanically like they did in life (with a few added undead immunities). They cannot leave the Doomvault or they’ll instantly die. If they are not returned to life by the end of the adventure they will eventually transform into a Wight.
My DM took pity on the petrified PCs. Although they were technically not dead and shouldn’t have been able to benefit from the Walking Dead option, he allowed them to do so if they wanted to. The player running the Ranger decided to bring in a new character, an Elf Druid. The other player opted to transform his Gnome Wizard in a soul-bound undead.
Before proceeding to the next area some PCs decided they needed to rest. The party still had two vials of water from the Fountain of Recover which would grant the benefits of a short rest. The spellcasters who’d used a lot of resources wanted a long rest so they opted to use the Seclusion Crypt. This is a pocket of space on a demiplane (think portable hole). Time passes within the demiplane, but no time passes in the world. Despite caution from Syranna that using the Seclusion Crypt too frequently could have negative side effects two PCs used it.
Now that the wounded PCs were healed and refreshed, we moved onward into unexplored territory of the Forest of Illusion.
Forests of Slaughter
With the Gorgons defeated and the party refreshed we moved from the Gorgon Lair (#48) west towards the Hook Horror Next (#46). However, our DM switched the encounters for areas #46 and #49 so we were actually heading towards the Gate Carven. For whatever reason, we decided to hug the north wall of the cavern during our approach to area #46. This kept us away from the Cockatrice Roost (#47) which likely would have left more PC trapped in stone.
In order to pass from area #46 to area #65 in the Ooze Grottos we needed to pass through a White Gate. The gate was guarded by two humanoids that we could tell were undead. Rather than fight our way past we decided to return to the Black Gate in the Gorgon Lair and use our newly empowered Glyph Key to teleport right into the Black Gate in area #65.
Ooze Grottos
 Immortal Caverns
Red Master (#65)
When we arrived in the cavern we saw an enormous pillar of thick, red liquid stretching from floor to ceiling. The DM described it as a pillar of red Jello because it was quivering and shaking a bit. Inside the translucent pillar was a Red Wizard. It was unclear if he was alive or dead but his eyes were closed.
If this Red Wizard was trapped within the pillar by accident or for some form of punishment, freeing him might earn his favour. We tried a few tricks with ropes and Mage Hands to get him out of the pillar but the red substance seemed to be acidic and burned anything that touched it.
Eventually the Red Wizard’s eyes opened and he freely stepped out of the pillar. He asked who we were and what we were doing here. Our recently revived undead Wizard said we were looking for a way into the Temples of Extraction. The rest of the party face-palmed, realizing how bad it was to reveal this information. The Red Wizard immediately attacked.
We decided to run into the next room to escape this new foe. Most PCs ran away, but the undead Wizard couldn’t resist firing Magic Missiles at the Red Wizard. The Cleric and my Barbarian stayed back to block the Wizard while the rest of the PCs fled. The Red Wizard managed to get all the PCs with a massive Fireball. That got us mad so the decided to kill him. The parties Wizards both used empowered Magic Missile spells to ensure hits. The Cleric and Barbarian both attacked with weapons and dropped the Red Wizard. When he died his body melted into goo and flowed back inside the red pillar.
White Maw (#64)
When the first four PCs entered this room while running from the Red Wizard they realized that the room was remarkably clean. The floors and walls were smooth and white. In the centre of the room was a cracked black pillar.
After defeating the Red Wizard, the Druid, Monk, Rogue, and Tiefling Wizard moved right up to the White Gate where they waited for the Barbarian to use the Glyph Key. The floor and walls near the gate were not white.
When the undead Wizard, Cleric and Barbarian stepped onto the white area it shifted and changed shape. The White Maw (an exceptionally large Ooze) engulfed them forming a bubble that closed off the passage and trapped the three PCs. A voice echoed throughout the bubble accusing the PCs of slaying the Red Master. The quick-thinking PCs realized they might talk their way past this obstacle and tried to bluff their way past. That didn’t work. They instead turned to intimidate with greater results. Unfortunately the White Maw was not of one mind. While the PCs intimidated the first personality a second more aggressive personality took over and attacked.
The four PCs trapped between the newly formed white wall and the White Gate immediately attacked the wall. When the Rogue’s weapons hit the White Maw they started to dissolve. Contact with the Ooze damaged weapons permanently. The PCs switched to missile weapons and magic.
Inside, the Barbarian tried attacking the pillar but that didn’t help. The undead Wizard was knocked unconscious before he could cast Lightning Bolt leaving the Cleric and Barbarian to duke it out with the room-sized Ooze. After exchanging blows with the creature from the inside and outside leveler heads managed to talk down the White Maw and convince it to let us pass. As soon as the passage to the White Gate was revealed the Barbarian ran to it and used the Glyph Key to let the party pass through.
Augmentation Chambers
Spawn Vats (#63)
Before passing through the White Gate completely, the party took a quick breather inside the portal. The undead Wizard was unconscious and none of the magic healing the party had would work on his undead form. The Cleric decided to cast Animate Dead as a ritual to once again bring the Gnome Wizard back into the game. The DM allowed it.
The PCs could see through the white veil into the area #63. They noticed four undead guards tending the vats. The party decided to let the Cleric take the lead. We’d act like we were supposed to be in this room. If questioned the Cleric would exert his dominance and if necessary threaten the undead with his divine powers. We decided to drop the Red Wizard Merric’s name if asked for a contact.
Before we stepped into the room the Cleric decided to command his newly animated undead ally not to speak unless he was casting a spell. The PC failed his save so he was silenced.
The PCs didn’t get far before the Deathlock Wights stopped them and demanded they explain their actions. For a few rounds the deceit seemed to be working. And then two PCs noticed a Red Wizard poke her head out from behind a curtain for a brief second. After that the undead got aggressive.
My Barbarian won the initiate with a natural 20. He quickly slipped behind the curtain to see what was back there. He spotted a Red Wizard hunched over an alchemy lab. With a natural 20 on my Stealth roll I managed to sneak up behind her and get my sword under her throat. I told her to call off her goons as we weren’t here to fight. She did. The PCs on the other side of the curtain realized the enemies had backed down. The Tiefling Wizard acted next and followed my Barbarian behind the curtain. He relayed what was happening to the rest of the PCs.
I told the Red Wizard we only wanted her Glyph Key which I could see hanging from her neck. She gladly gave it up as long as we left her and her experiments unharmed. We agreed.
The Rogue sneaked behind the curtain and took a few choice items before he and the rest of the party moved into the passage to the north. My Barbarian apologized for the way the interaction went down, but the Red Wizard showed no fear or sympathy. She told the PCs it didn’t matter that they lived because when she finished her experiments they’d all be dead.
Thoughts
This was another fun session. I find I’m really enjoying the opportunity to be a player at public play again. However, I am trying really hard to separate what I know as a DM from what my character would know. I think I’m doing ok so far.
I think our DM did the right thing at the start of the session by allowing the PCs to escape their stone prisons and take the Walking Dead option. I was also happy to see one player did it. It certainly speaks to his commitment to his character rather than a desire to just power game.
Again this week we faced monsters that were fully capable of wiping out the party. Fortunately we’re learning that talking and running are both acceptable alternatives to fighting everything we see. Regrettably what we’re saying is getting us into more trouble that just attacking outright, but we’re learning from these mistakes.
It was refreshing to finally face some actual Red Wizards this session. After heading through the Forests of Slaughter and the Ooze Grottos we were sure we were going to face nothing but monsters. Since part of our objective is to find Glyph Keys attended to the Temples of Extraction we needed to move to areas of the dungeon that looked like they’d be populated by people and not creatures. Our perseverance finally paid off.
What areas of the Doomvault has your party explored so far? How many PCs in your party have died? Have any taken the walking dead option?
Additional Resources
- Pre-generated characters: Visit our D&D Next Pre-Generated Character Library where you can download the level 6 pre-gens that came with this season’s adventure.
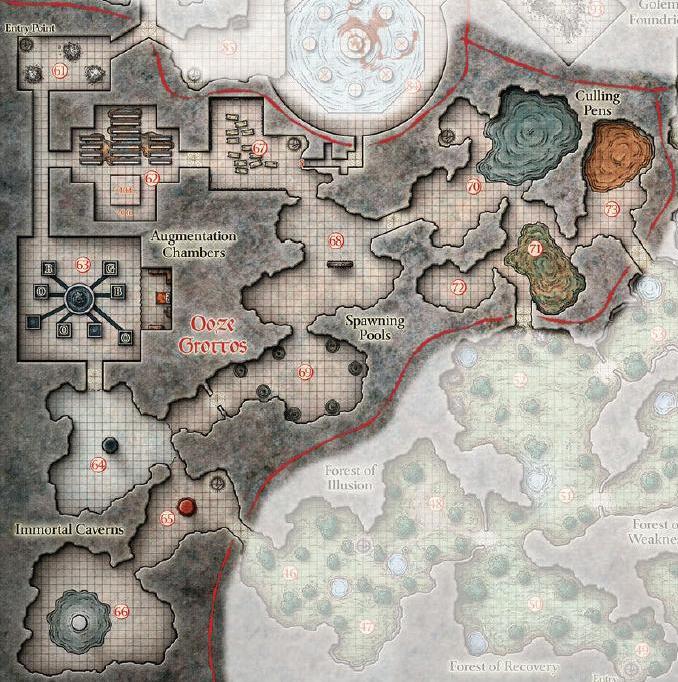
- Players Map: Download a map of the Doomvault, this season’s super dungeon, from the Wizards of the Coast website.
Recounting Encounters Podcast
Listen to Derek Myers, Craig Sutherland, and Marc Talbot (from 20ft Radius) recount our weekly experience at D&D Encounters. We share the highlights from our respective tables and we talk about what worked, what didn’t and what we might have done differently. Find all episodes of Recounting Encounters on iTunes.
Note: New episodes of Recounting Encounters will be available in our D&D Encounters Archive and on iTunes on Wednesdays moving forward. Now DMs can listen before they play.
Actual Play Podcasts
We continue to record our D&D Encounters sessions and make them available to you for download every week. These recordings are made in a loud, crowded game store so at times it may be difficult to hear everyone. Some language may be inappropriate for all ages, although we try to keep it as family-friendly as possible.

Visit the Dungeon’s Master D&D Encounters Archive for all of our ongoing weekly coverage as well as other great D&D Encounters articles and resources.
 Looking for instant updates? Subscribe to the Dungeon’s Master feed!
4 replies on “D&D Encounters: Dead in Thay (Week 3)”
Wow. I’m impressed that you’re getting so much into your 2 hour weekly sessions. Bravo for your group.
I had a tough week this week. The other DM had thrown his back out, so I knew I’d be going solo at our FLGS. However, almost every one of our occasional players showed up, plus a younger kid (about 12) who was brand new to roleplaying of any sort (let alone D&D). Fortunately I had some Essentials pregens written up (he chose a dragonborn cleric), and the players sitting on either side of our new kid were very helpful. So we got started with a table of NINE.
We’re running my 4e conversion of the season, and this week was the Abyssal Prisons. I’ve been using a “random encounter table” that just tells what happens and what minor treasure is gained from fights that we sort of hand-wave (because if we ran 7-8 4E fights every week, we’d be there for 10+ hours). This week their random encounter was a Clever Trap, which resulted in everyone taking 5 poison damage, but gaining 50 GP each.
The party ended up getting to a room with a single cage and a tiger-like person standing in the middle of it. This was Kalarel, a rakshasa, who did all he could to manipulate the PCs into setting him free. The bars of his cage dealt radiant damage, and also had healing magic infused. The fact that we had a deva in the party made the interactions difficult (since rakshasas are effectively reincarnated evil spirits of deva in 4e), but the party realized that the bars had healing magic so that Kalarel couldn’t actually die in the cage (preventing him from reincarnating somewhere else). The deva, paladin, & clerics in our party were fine leaving Kalarel to rot forever, but the assassins and bladesinger decided to offer to eventually release him if he told them about what else they could expect.
Kalarel explained about the Warden, who ran things & had a magic ability to open any door in the Prison, and about the tiefling vampire who ran an arena for the amusement/combat of prisoners. He said the Warden would likely be found at the arena, so the party eventually made their way there.
At the arena (I used the paizo “Arena” flip map, since the D&D Bloodsand Arena, while a great map, was just too huge), the party ended up fighting the Warden (a demonic gnoll, though I used the large Yeenoghu mini for intimidation factor), 2 lesser Mezzodemons, & 2 Gricks. With a table of 9, I ended up making the monsters hit a little harder, but removed most of the “complicated” things the did like different ongoing damages. Basically turned them into damage outputting hit point bags, and let the party do as many cool tricks as they wanted to them. The new kid was super happy to have his Searing Light work on the warden, which blinded the warden and saved the party from several hard-hitting attacks. Other folks split off to fight different foes, though the sheer number of PCs at the table meant that everyone had a buddy for flanking.
The fight dragged on, as 4E fights sometimes do, though I think I made reasonable progress in teaching folks to have their actions planned ahead of time so that they’d be ready when their turn came up. The new kid’s mom showed up as 9:00 rolled into 9:15, so I ended up having the other demons flee when the Warden was defeated, and the party suddenly had the badge and the key to the next area.
The badge was a new problem, though, because it kept trying to merge with whomever was holding it. Also, so long as there was no Warden, all the other demonic prisoners started rioting, and the party had to flee, not getting any kind of rest. Some Arcana checks revealed that whomever became the new Warden would also be trapped in this zone, but after some debating, they decided to give the badge to Kalarel, who would still be trapped, but could at least stop all the other now rampaging demons from attacking them long enough to take a short rest and then have Syranna activate the new key to get them to the next zone.
In an evil plotting, long-game kind of way, Kalarel accepted the “gift”, along with its corresponding curse, and the party was able to briefly rest (though the deva never let his eyes leave the rakshasa) and then have Syranna send them to the next region. Next week is the Blood Pens, where the party will see what sort of awful experiments Red Wizards like to do in their spare time.
Big tables are always a challenge, but we’ve got good players who’re willing to work together (mostly) to help the story, so we did okay this week. The railroading of my version was essential, though. If we’d had all the options in the published D&D Next version this week, the party would have scattered all over the place, and it would have been chaos.
This week, our table had a party of 4: the warforged bard, tiefling cleric/fighter/barbarian, and halfling barbarian/monk/cleric/rogue from previous sessions, and a new member, a dwarf monk.
After our trip through the portal to take our rest, Syranna told us through the circlet that she was sending another person to help us (the dwarf). We returned to the Prison of Filth, where we to searched for useful loot (to no avail). We then entered the next room to the north, where we saw about 20 skeletons standing immobile. The halfling snuck in and attuned the amulets to the contact stone in the room, but the skeletons ignored her.
From there we went to the next area, the caverns of chaos. When we arrived, we saw several gricks, killing 2 before they were even aware of us. After the gricks were killed, we engaged 2 gibbering mouthers, and the tiefling was attacked by a grell. The bard used a large amount of his healing spells needlessly, despite the party members saying it was unneeded, and the realization that it wasn’t working half the time. After the combat, we explored the room, finding an altar at the far end. The altar bore our faces on the sides and outlines of various items atop it. None of us could determine it’s function, so we moved on.
In the next area, we found a red ring that we discerned was used to bring creatures from the far realms into the doomvault. The bard defaced several key runes, but was struck by a beam of energy, causing some negative effects.
With this done, we moved on to the forests of slaughter.
The first portion of the new area was the forest of weakness, where we saw several owlbears around a pool. I intended to avoid combat if possible, but the other cleric of war decided glory was more important. He charged the biggest one, and the rest of us were drawn into the fray. It was a quick and bloody skirmish, with the monk and the tiefling’s horse getting dropped to 0. A quick casting of spare the dying was all they needed, but by the time they were back up the owlbears were all taken care of.
So far, nobody has died, which is fortunate. The very nature of this dungeon means conservation of resources is of the utmost importance, a fact that some members of the party seem to forget regularly. We were also short a few regulars this week, meaning the fights were a bit tougher than if we had everyone, so all things considered, we did pretty well.
This week, with finals going on, we only had one table of 6 players in League City, Texas (South side of Houston) at Empire Central.
Rather than a detailed recap, I wanted to give a little more insight into behind the scenes actions of the creatures, that the players normally don’t see.
Our party (made up of a Drow Fighter, Elf Mage, Dwarf Mage, 2 Human Clerics, and a Half Elf Paladin) entered the Masters Domain!
A Note on the Glyphs:
I changed the mechanics of the Glyphs slightly, as we have a lot of new players, and rather than flooding the dungeon with Glyphs, I instead, only gave glyphs to the players that were present the first night. I also don’t allow Syranna to Attune the Glyphs, since it might result in an explosion. As far as the players know, they MUST find more glyphs. They haven’t learned yet, that you can attune them with a Contact Stone.
Summary:
They entered the Cavern Guard Post, but in the first round destroyed all the guards with 2 Fireballs. They then sent the Paladin into the Shard Cavern, which he then set off, alerting all the guards in Dread Legion Barracks that there were intruders. However, rather than pushing the assault, the party regrouped back in the Cavern Guard Post room, and spent a few minutes preparing a plan.
When they did attack they first lobbed their Fireballs over the ledge into the Barracks, fireing blindly but hoping to catch any creatures in the blast…After a long and fun combat (with trolls getting back up to fight again and again), they eventually defeated everyone, and captures the Thayan Warrior leading them, who had in his possession a Master Key. However during questioning, the Warrior convinced the PC’s to give the key back to him, so he could show them how to attune it…at which time he promptly smashed it, and the PC’s killed him.
With his dying breath, the warriors eye’s rolled up in his head, and a woman’s voice was heard hissing a threat to them “I will destroy you all!”, his head then rolled forward and he died.
They played around the the Black Gates a bit, and discovered how they can teleport to other areas, then they returned to the Gatehouse to rest.
—
Here’s what the Enemy NPC’s did:
When the Cavern Exploded:
This alerted the Warrior, orcs, gnolls and trolls that ‘someone’ was coming. So they went on alert, taking up defensive positions, and sending a few ‘scouts’ to see what set off the trap.
Two gnolls appeared and saw the paladin exit the cavern, and shut the door. They returned and let the Warrior know there were intruders coming.
Thar be FIREBALLS!
The line of defenders were far enough back so that the fireballs didn’t harm anyone, but it alarmed the Thayan Warrior enough that he contacted his superior, Phaia, through the Contact Stone in the room, to let her know a strong force of wizards were attacking. She told him to hold, and learn what he could.
Poking his head out!
During combat, the Drow cast his Darkness spell, which the warrior used to hide from the enemies in, until he could learn more. The Thayan Warrior poked his head out of the darkness, took stock of what was going on, and decided to retreat, and prevent the intruders from gaining his ‘Master Key’. This almost worked, except the Drow had also entered the darkness, and through blind fighting gained an Opportunity Attack as the warrior fled past and then chased him, caused him to fail his roll to Run, get his key out and activate it, so he wasn’t able to fully get away.
The Questioning Begins:
The Warrior was questioning the heroes at the same time they were questioning him. But with a little help 🙂
Phaia, had actually teleported into the Guard Post room, through the Black gate in there, cast invisibility and moved in behind the party to spy on what they were doing and learn their purpose. Using a little magic 🙂 Red Wizards are VERY adept at cantrip illusions, being able to cast Overlapping Minor Illusions simultaneously. Phaia used Ghost Sound to ‘whisper softly’ in the Thayans ear, and help guide him in his questions…then prompted him to get the key back and destroy it. The players had cast Zone of Truth on the warrior, but even so, he wasn’t compelled to ‘tell the truth’ He only had to make a saving throw vs CHR to avoid telling a deliberate lie, to which he willingly told the truth in regards to the room beyond, his boss, and his lack of knowledge of the other zones. He then offered to help the PC’s with the master glyph key, to make copies, something that was not a lie, but that he could do. If they had asked him pointedly if he was going to destroy it, or something to that extent, they would have been able to tell if he was lying or not in his answer.
Once he had destroyed the key, and the party had attacked him, Phaia yet again, cast minor illusion of silent image and ghost sound ( she can do both at once ) to create the White Eyes, and Woman’s voice coming from his mouth. This gave the PC’s quite a start, and definitely set them on edge.
During the questioning, the Warrior asked if the PC’s were part of the Resurrection movement (being guided by Phaia’s whispers), and once they affirmed that they were, he pretended to want to help them and gain their trust. They revealed to the Warrior that others were also invading the Doomvault and they had access to a Gatehouse, which they were using to teleport to different parts of the vault.
Satisfied with what she had learned, and that the ‘Master Key’ had been destroyed…Phaia left to continue her own plans.
—
Thought ya’ll might want to see a little of what goes on in my mind as the DM.
Also…since the Red Wizard are now aware of the Gatehouse, and that more ‘adventurers’ are coming into the Doomvault via it…the Alert Levels will be raised to keep an eye out for them 🙂
—
The players I shared this with, are now VERY paranoid about what’s to come.
*FUN IN TEXAS*
My players seemed intent on searching every single side room of the Wizards Court this week, hence the appearance of a Random Encounter.
Also I decided to put the Tome of the Stilled Tongue from Lhanis’s locker in one of the libraries. I couldn’t see any details of what the book did in the adventure and didnt have access to the magic item pdf at the table so decided it was a cursed item making the reader WIS save (DC 15) or be struck mute. I have since read the item description and to be honest prefer my version.
Our first death came this week with the paladin being knocked unconscious and taking an auto-fail by multiple magic missile spells (seperate spells, not just multiple missiles) before my last wight used his sword attack to coup de gras him. He was almost joined by the barbarian on several occassions but thanks to the use of healing spells the brute was kept upright.